Question:
How can I view the results of my Google Form survey?
Answer:
Open your Google Spreadsheet, and in the FORM menu choose SHOW SUMMARY OF RESPONSES. This screencast will show you how.
Wednesday, March 24, 2010
Finding Course Communication Tools
Question:
How can I find the course communication tools for our class, like our Scribes blog?
Answer:
Visit wiki.powerfulingredients.com/Home/t4t/course-communication-tools. This screencast also shows you how.
How can I find the course communication tools for our class, like our Scribes blog?
Answer:
Visit wiki.powerfulingredients.com/Home/t4t/course-communication-tools. This screencast also shows you how.
Friday, March 12, 2010
Unit Plan Template and Rubric
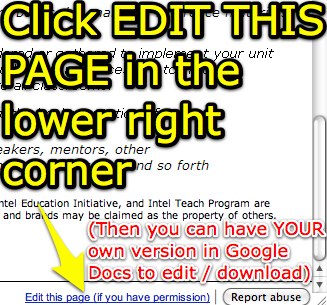
Here are the two documents you'll need to complete for your T4T Unit Plan Assignment. These are both shared as Google Documents, which you can COPY and add to your own Google Docs account. Do this by clicking the EDIT THIS DOCUMENT button in the lower right corner of the screen, as you are viewing the document.

You can edit the template on Google Docs or in MS Word, before submitting it through Passport.
For your Google Site assignment (week 7) you just need to write a brief outline of what you're planning to do for your unit plan. If you want you can link to a read-only version of your Unit Plan Template on Google Docs. If you do that, I (and potentially others) can give you specific feedback on what you've written and done so far.

You can edit the template on Google Docs or in MS Word, before submitting it through Passport.
- Unit Plan Template (you will fill this out and turn it in)
- Unit Plan Rubric (check this to see how your plan will be graded / assessed)
For your Google Site assignment (week 7) you just need to write a brief outline of what you're planning to do for your unit plan. If you want you can link to a read-only version of your Unit Plan Template on Google Docs. If you do that, I (and potentially others) can give you specific feedback on what you've written and done so far.
Tuesday, March 2, 2010
Granting public access to your VoiceThread
Question:
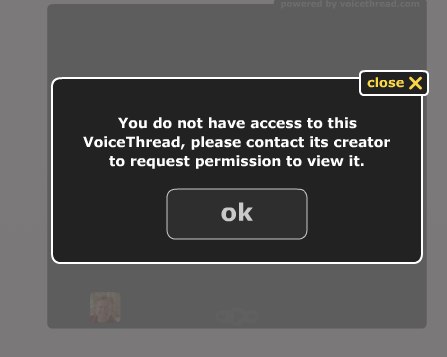
I received a message that my VoiceThread cannot be viewed publicly, so I can receive a grade for the Miniproject 1 assignment. How can I make my VoiceThread public?

Answer:
Here are the steps you should follow:

Make sure you click SAVE after you make these selections. Your VoiceThread will now be visible on your blog, if/once you've embedded it on a post there.
You will NOT have to reblog/ repost your VoiceThread there, the permissions change will take place and it will be visible to others who visit your blog.
The VoiceThread appears visible to YOU before you do these steps, if and when you're also logged into VoiceThread. To check the visibility of your VoiceThread (how it will look to others who visit your blog) you need to log OUT of VoiceThread, and THEN visit your blog post.
I received a message that my VoiceThread cannot be viewed publicly, so I can receive a grade for the Miniproject 1 assignment. How can I make my VoiceThread public?

Answer:
Here are the steps you should follow:
- Log into your VoiceThread account.
- Click the "gear icon" and choose to EDIT your VoiceThread.
- At the bottom of the VoiceThread browser window, click PUBLISHING OPTIONS.
- Make sure the FIRST THREE boxes are checked. (Allow anyone to view, allow anyone to comment, and moderate comments)
- The last checkbox is optional and up to you. If you want others to be able to find / browse to your VoiceThread, select this. You don't have to, however.

Make sure you click SAVE after you make these selections. Your VoiceThread will now be visible on your blog, if/once you've embedded it on a post there.
You will NOT have to reblog/ repost your VoiceThread there, the permissions change will take place and it will be visible to others who visit your blog.
The VoiceThread appears visible to YOU before you do these steps, if and when you're also logged into VoiceThread. To check the visibility of your VoiceThread (how it will look to others who visit your blog) you need to log OUT of VoiceThread, and THEN visit your blog post.
Embedding a video in WikiSpaces
Question:
In a wiki I created in wikispaces, how can I embed video?

Answer:
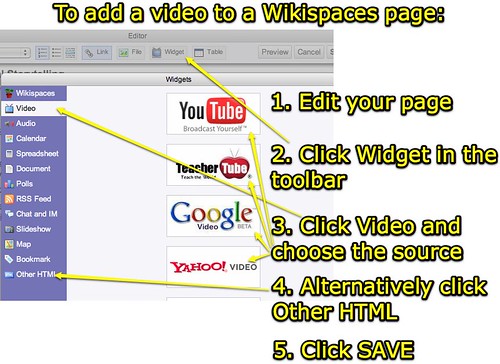
Before working on your WikiSpaces site, copy the embed code for your video from the website where you found it or uploaded it. The steps to do this are:
This 1 min, 43 second YouTube tutorial demonstrates these steps.
In a wiki I created in wikispaces, how can I embed video?

Answer:
Before working on your WikiSpaces site, copy the embed code for your video from the website where you found it or uploaded it. The steps to do this are:
- Edit your page on which you want to put a video.
- Click WIDGET in the toolbar.
- Click VIDEO and choose the source of your video.
- Alternatively (if you want to embed video or other media from another site) click OTHER HTML. Paste your embed code.
- Click SAVE.
This 1 min, 43 second YouTube tutorial demonstrates these steps.
VoiceThread commenting options
Question:
I tried to use voice memo on my iphone to upload voice comments to my VoiceThread, but its telling me that to do this I have to upgrade my VoiceThread account and pay for it. What other options do I have?

Answer:
The screenshot above highlights your five options. These are visible in VoiceThread when you click the COMMENT link under a photo.
I tried to use voice memo on my iphone to upload voice comments to my VoiceThread, but its telling me that to do this I have to upgrade my VoiceThread account and pay for it. What other options do I have?

Answer:
The screenshot above highlights your five options. These are visible in VoiceThread when you click the COMMENT link under a photo.
- Record a voice comment with a microphone connected to your computer.
- Type a text comment with the keyboard.
- Upload an audio or video comment you record with another website or program. (Drop.io is a free phonecasting service you can use, or Audacity is a free audio recording program that will work. Either way you'll want to get a mp3 audio file, and then upload that to VoiceThread.) Your iPhone memo recorder works too, but you'll have to sync your iPhone to iTunes, find the Voice Memo playlist which iTunes automatically creates, and then drag the recorded memo to your desktop or other location where you can subsequently find it / upload it. See below for upgrade options, if you register for the FREE educator account you can (I think) upload audio and video.
- Use a computer webcam to record a video comment.
- Use a phone to directly record a comment. That was the option you tried, and as you discovered only 3 minutes are provided for free. Use one or more of the other five options listed here to comment.
If you don't see all five of these options, you probably didn't register for a free K-12 educator VoiceThread account. You can register for that account using your .edu address, or alternatively pay a one time $10 fee upgrade your account to "Pro Educator" status.
Posting to the T4T Scribes Blog
Question:
Once I'm in the T4T Scribes blog, how do I post my blog. I did choose to follow the blog.

Once I'm in the T4T Scribes blog, how do I post my blog. I did choose to follow the blog.
Answer:
First, log into Blogger with your Google ID.
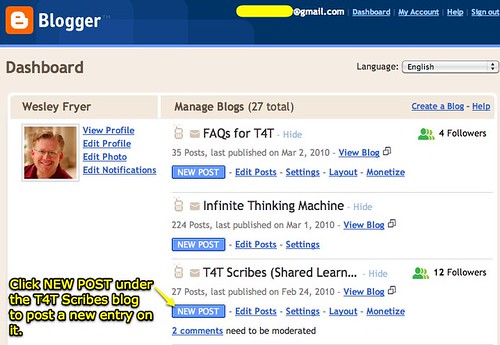
Second, you will need to click NEW POST underneath the title of the "T4T Scribes blog," as shown in this screenshot.

Be sure you click NEW post under the correct blog! Some people have inadvertently posted to our Scribes blog when they intended (I think) to post to their own reflections blog. All your posts for our class should go on your own reflection blog, EXCEPT your weekly summary blog post. Remember the assignments for our weekly summary posts are listed on both our FAQ blog and the Scribes blog.
Third, you'll write your post and click PUBLISH POST!
Third, you'll write your post and click PUBLISH POST!
Citing homegrown images / media
Question:
When you are using home grown media in voice thread do you just leave the link blank for every picture, since there is not a link for them?

Answer:
You are correct, you can just leave the "link" for the VoiceThread photo blank if it is one you have taken yourself / own. (Homegrown media)
You can optionally include a link to your own website (like your blog) or a photo sharing page where you've uploaded and shared the image. If you choose to insert images from a Flickr Set that you've created, VoiceThread with automaticaly insert the image title and links back to VoiceThread for you. This is a VERY cool feature, but is not required.
When you are using home grown media in voice thread do you just leave the link blank for every picture, since there is not a link for them?

Answer:
You are correct, you can just leave the "link" for the VoiceThread photo blank if it is one you have taken yourself / own. (Homegrown media)
You can optionally include a link to your own website (like your blog) or a photo sharing page where you've uploaded and shared the image. If you choose to insert images from a Flickr Set that you've created, VoiceThread with automaticaly insert the image title and links back to VoiceThread for you. This is a VERY cool feature, but is not required.
Subscribe to:
Comments (Atom)


