 This is similar to the way you need to copy the direct link of a Google Map in a specific place. (See this FAQ post for more on that.)
Saturday, November 27, 2010
Find the direct link to a 21classes.com blog post
For our "checkpoint blog post quizzes" for class, and other assignments, you need to copy and paste the DIRECT URL or web link to the blog post you wrote for a specific class assignment. The following screenshot shows where you can click on our 21classes.com blog posts to get a particular blog posts' "permalink." Make sure you copy THAT link, instead of the link that happens to be at the top of your web browser when you are viewing a post. This is similar to the way you need to copy the direct link of a Google Map in a specific place. (See this FAQ post for more on that.)
This is similar to the way you need to copy the direct link of a Google Map in a specific place. (See this FAQ post for more on that.)

Thursday, November 25, 2010
How should I give image attribution in a VoiceThread?
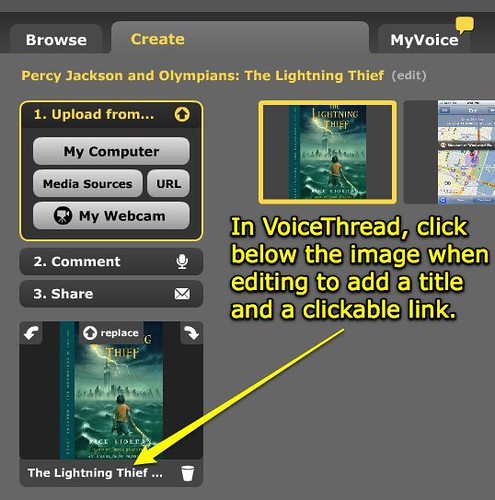
VoiceThread provides a great way for students to provide "clickable" links to the websites where they originally found images used in their interactive digital stories. When editing an image in VoiceThread, click below the image in the thumbnail in the left column of the screen to add a title and link:
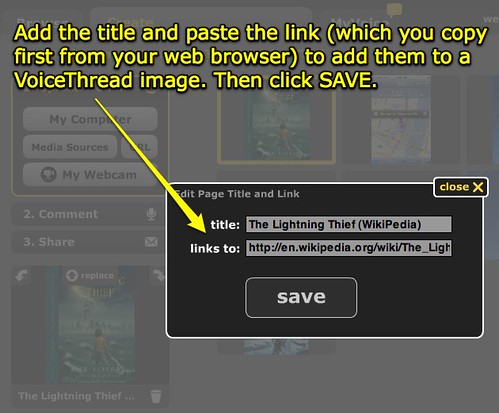
Then add the desired title and link. You'll want to copy the link first from a web browser. It's a best-practice for students to copy down the web addresses / URLs of websites where they find images they are using in projects AS they find them during the research process.
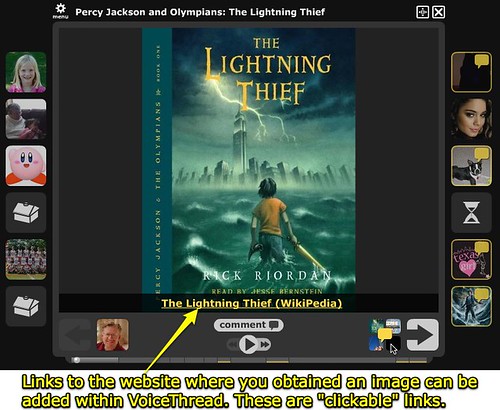
The final VoiceThread will show the image title and link when a visitor mouses over the lower right corner of thumbnail images in the VoiceThread.
Then add the desired title and link. You'll want to copy the link first from a web browser. It's a best-practice for students to copy down the web addresses / URLs of websites where they find images they are using in projects AS they find them during the research process.
The final VoiceThread will show the image title and link when a visitor mouses over the lower right corner of thumbnail images in the VoiceThread.

Saturday, October 9, 2010
Entering websites in Moodle Quiz
Q: Where do we enter our blog post websites / URLs in the Moodle checkpoints quizzes?
A: Enter each website / URL in the blank field after each question, as shown below. Make sure you copy the "permalink" address which is included near the bottom of each post.
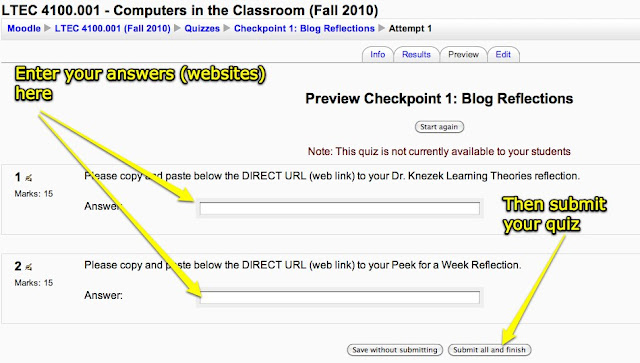
A: Enter each website / URL in the blank field after each question, as shown below. Make sure you copy the "permalink" address which is included near the bottom of each post.

Thursday, September 2, 2010
Create a new post on our 21classes.com blog
These are the steps to follow to create a NEW POST on your own blog, which is part of the class blog portal we're using this semester on 21classes.com. Remember the web address to our site (which you'll use to login) is untcic.21classes.com. Some instructions about using your blog are also available on the 21classes support site.
STEP 1:

STEP 2:

STEP 3:
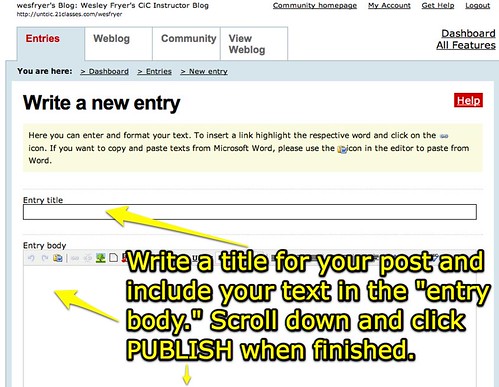
STEP 1:
STEP 2:
STEP 3:
Wednesday, September 1, 2010
Tutorial: How to use Compfight to save images for a presentation
This is a 5 minute screencast tutorial describing how to use the website Compfight to find copyright friendly images to use in a presentation. Resources referenced for this Pecha Kucha assignment are available on our CiC Fall 2010 course website.
Thursday, May 6, 2010
Make a custom Google Map
Beth Helm created the following 3 minute, 30 second screencast explaining how to create a custom Google Map. The only things I'd add to this excellent overview are:
Great job Beth!
- Remember you can use the Google Maps search bar FIRST before dropping a placemark and editing it. You can also pan and zoom within the displayed map view, so you can get the exact place you want to mark.
- Remember to click the RICH TEXT option when editing a placemark if you want to add a hyperlink or image, as Beth demonstrated.
- Remember to copy the direct link or embed code for a specific map by clicking the LINK button in the upper right corner of you map, instead of just copying the website shown in your web browser's address bar at the top as you work on your map.
Great job Beth!
Make a PowerPoint with 20 photos FAST
Kylee Woodard created this 1 min, 50 second screencast showing how to create a PowerPoint presentation VERY quickly using all the images in a single folder. In this case she used 20 pictures which she had downloaded/saved for her Pecha Kutcha presentation. Great demo Kylee!
Subscribe to:
Posts (Atom)

 Posts
Posts


